Live Trading with Interactive Brokers and QuantConnect
So you've coded a trading strategy and backtested it using QuantConnect. You now have a pretty chart of how much theoretical money you would have made in the past. Congratulations! Unfortunately, you can't pay your bills with backtest money and the only way to see how a strategy performs for real is to try it yourself. That's why today I'm going to show you how to live trade your strategy using QuantConnect and Interactive Brokers.
I will show you to do this in multiple ways. To start, I'll show you the easiest way, which is to connect your Interactive Brokers account to QuantConnect's infrastructure. Then, for those who prefer a DIY approach and want more privacy, I'll show you how to use QuantConnect's open source LEAN Engine and CLI to trade your strategy on your own VPS (Virtual Private Server). We'll also discuss the costs and benefits associated with each approach.
Obvious Disclaimer: short term trading is risky, writing code to trade is risky, and there are many things that can go wrong. So do these things at your own risk.
Going Live!
To deploy our algorithm, we'll be using QuantConnect's integration with Interactive Brokers. One of the benefits of using QuantConnect is that you don't have to make any changes to your code to go live. The same code that you wrote to backtest your strategy on historical data is used to trade your strategy in live mode.
Before using real money, we can run our strategy on a paper trading account to see how it responds in realistic conditions. We want to see how the strategy will perform on data it hasn't seen yet and also be sure our tools and infrastructure are functioning properly. If we are satisfied with how everything works in a paper trading environment, we can proceed and deploy to our live trading account and trade real money.
QuantConnect Cloud vs. Running Your Own Server
In this tutorial we will cover two ways to deploy our algorithm live. The easiest method is to use QuantConnect's Cloud since it has essentially a one click deployment. The more difficult approach is to install and configure the LEAN Engine on your own server. Let's discuss the pros and cons to each deployment method.
The Easy Way: Use QuantConnect's Cloud
Pros
- Simple and Easy
- Saves a lot of your valuable time
- Saves stress of worrying about servers and infrastructure
- Already built web-based UI and tools for logging, monitoring, and visualization
- Can use QuantConnect's data feed
Cons
- Costs Money
- Feels Less Private
- You Don't "Own" It
The Hard Way: Run Your Own Server
Pros
- Save Money - you have more control of your costs
- More Private
- It's Yours
- Build your own UI and tools
- You may already pay for a server anyway
Cons
- More Difficult
- Time Consuming
- Stress of worrying about servers and infrastructure
Deploying Using QuantConnect's Cloud
Let's start with the easy method. There is a one click deployment to Go Live and the same code you wrote for your backtest on historical data will now trade on new data coming from your broker. In this tutorial we'll be using Interactive Brokers, but there are many other brokerages and exchanges supported that I will mention shortly. This tutorial assumes you have set up an Interactive Brokers Pro account. If you don't have one, I have a special link that supports the channel.
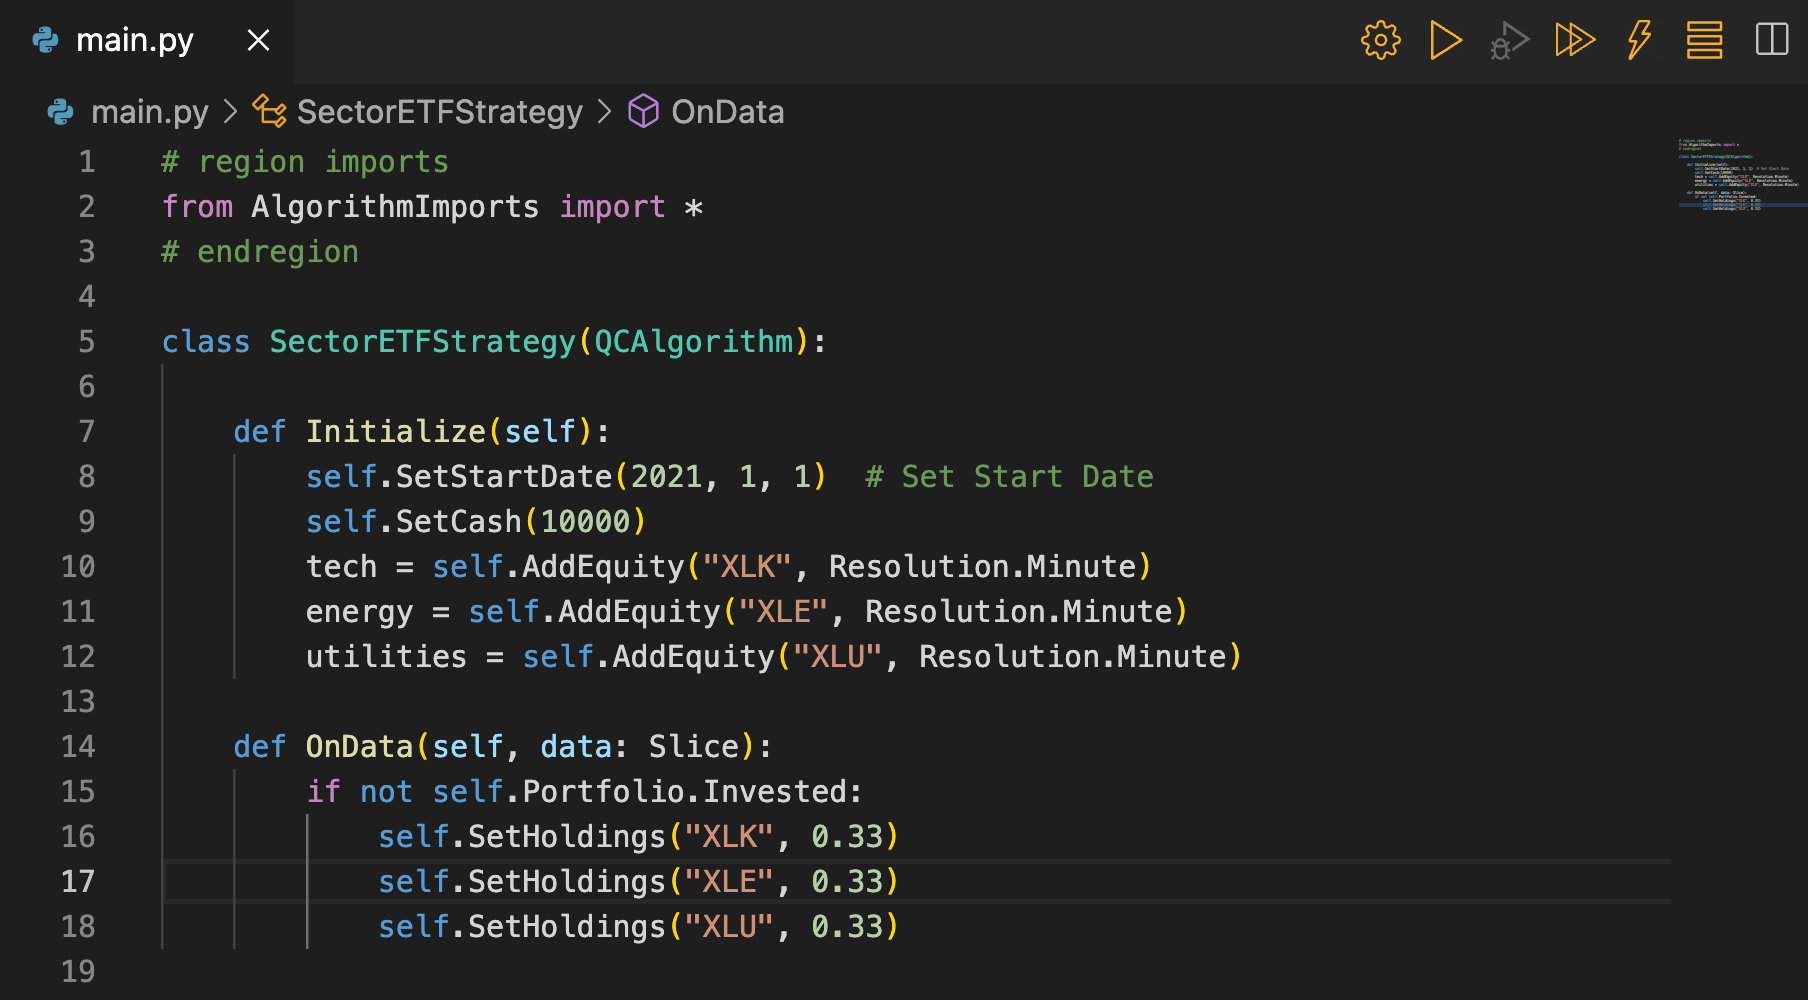
We'll start by deploying a basic example that buys and holds several sector ETF's on the first bar. First go the the Algorithm Lab in QuantConnect. Then create a new algorithm with the following snippet of code:
from AlgorithmImports import *

class SectorETFStrategy(QCAlgorithm):

    def Initialize(self):
        self.SetStartDate(2021, 1, 1)  # Set Start Date
        self.SetCash(10000)
        tech = self.AddEquity("XLK", Resolution.Minute)
        energy = self.AddEquity("XLE", Resolution.Minute)
        utilities = self.AddEquity("XLU", Resolution.Minute)

    def OnData(self, data: Slice):
        if not self.Portfolio.Invested:
            self.SetHoldings("XLK", 0.33)
            self.SetHoldings("XLE", 0.33)
            self.SetHoldings("XLU", 0.33)
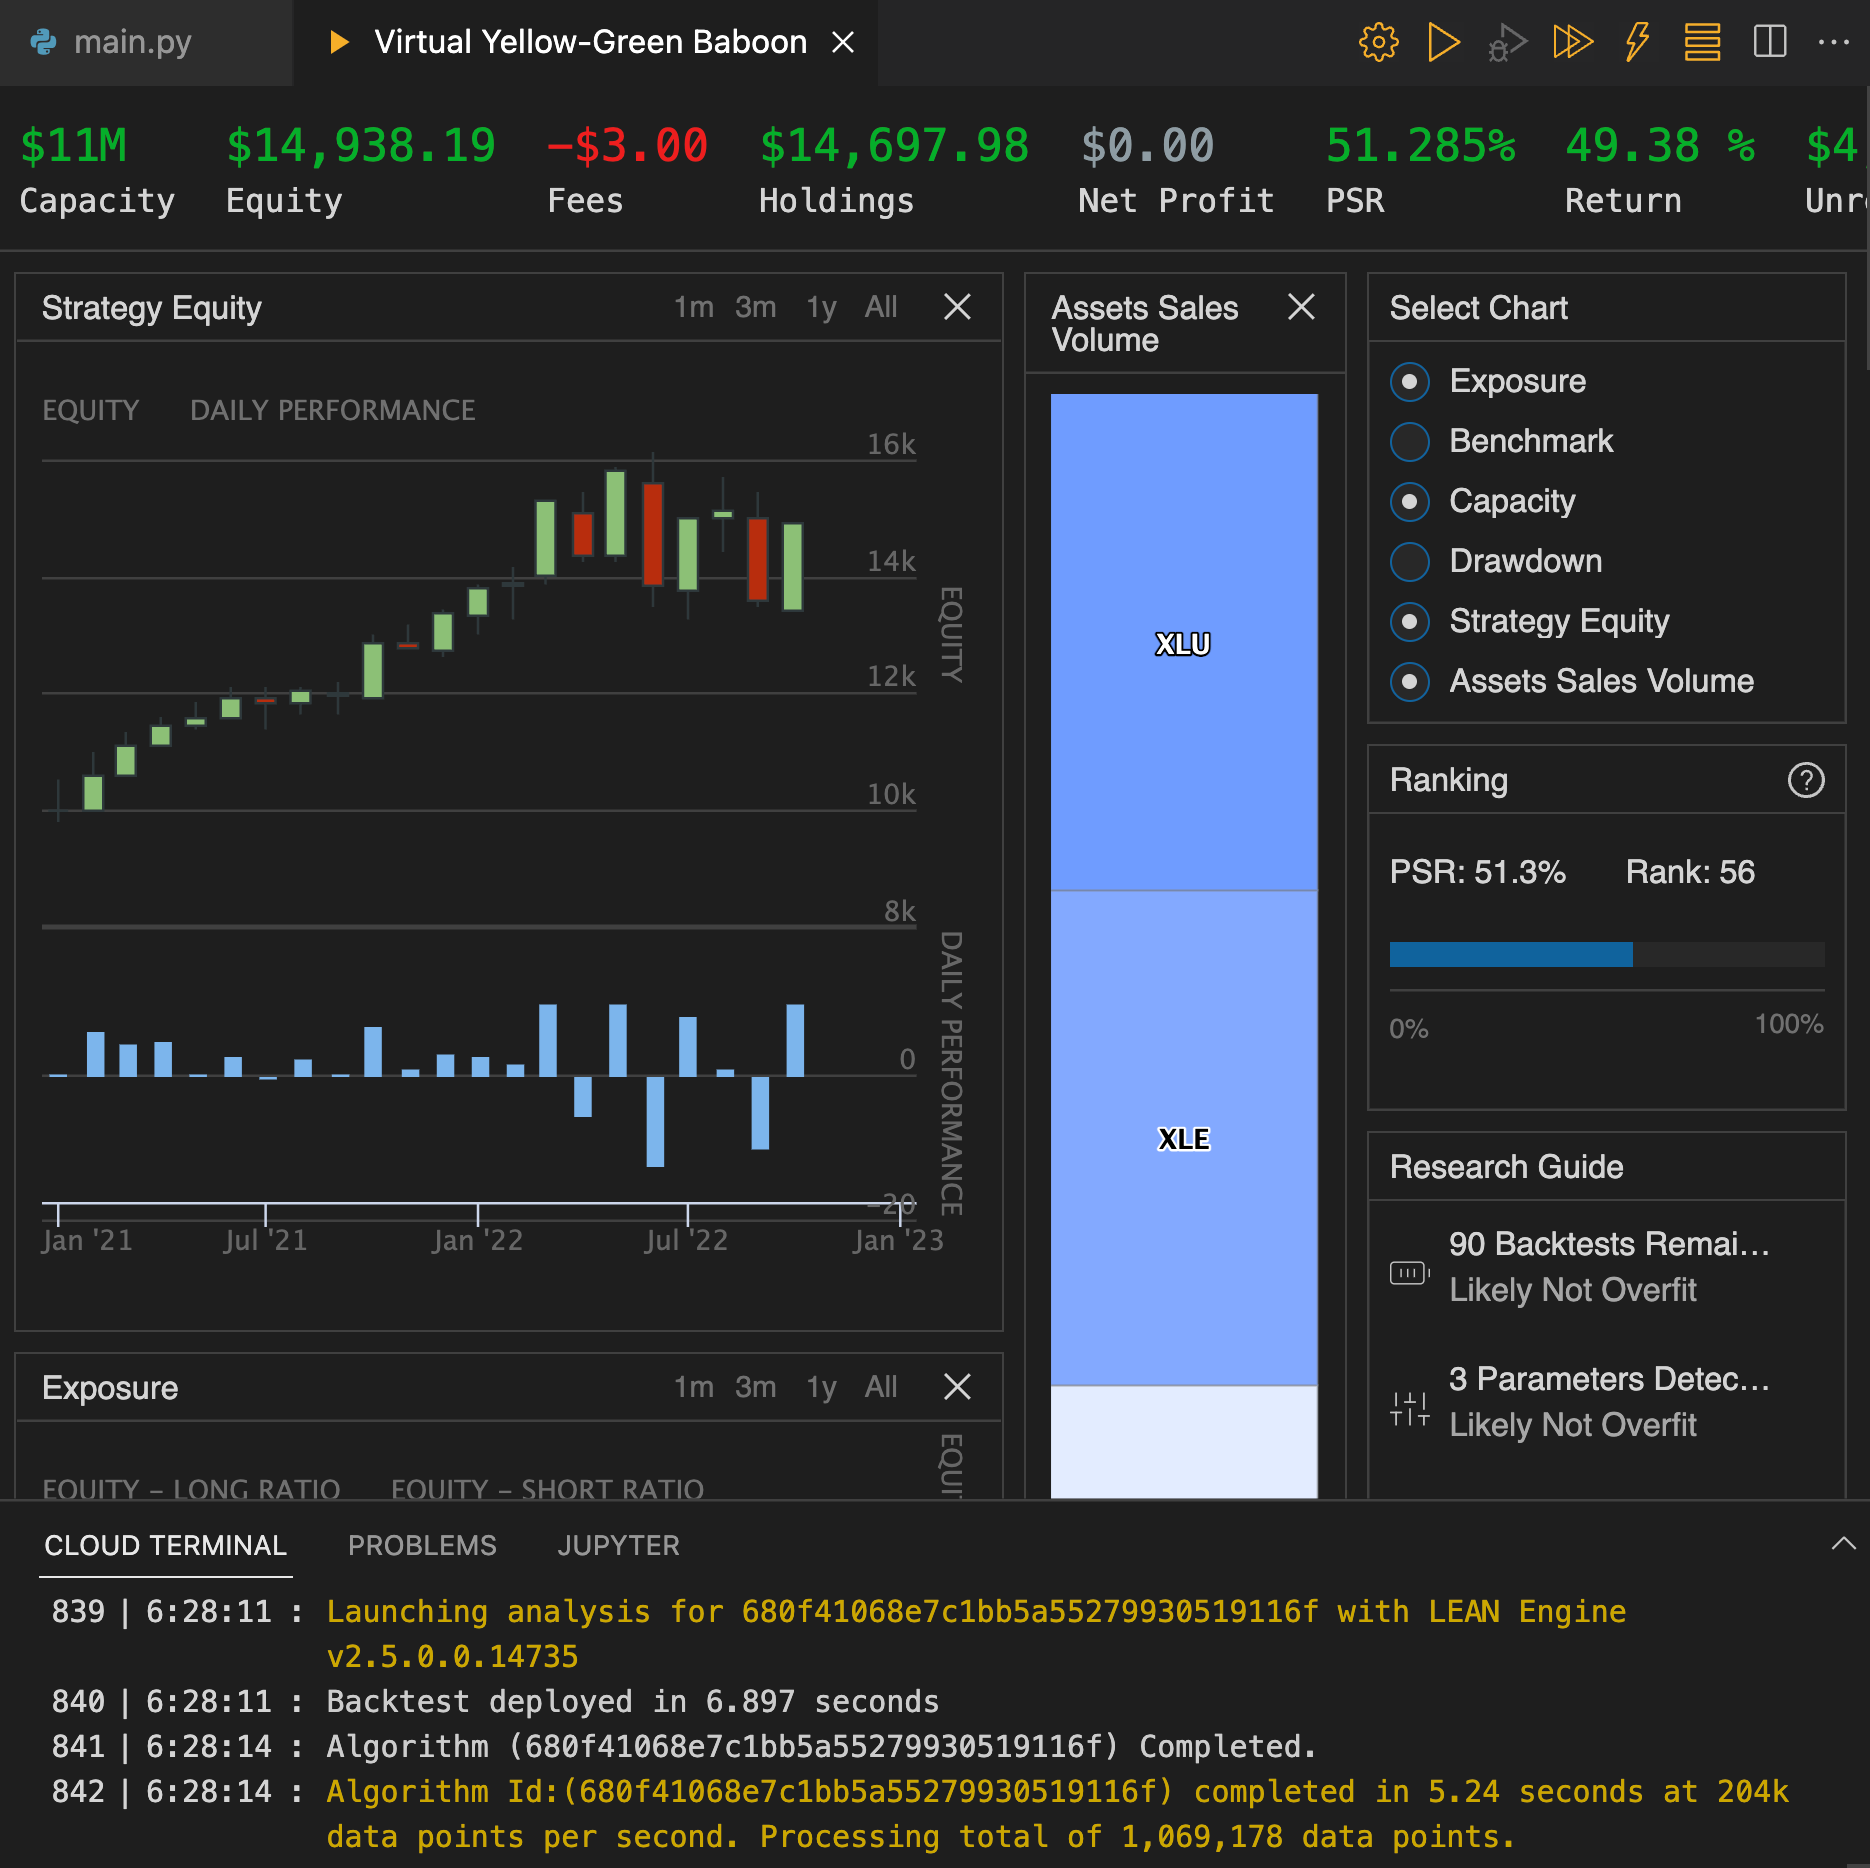
The reason we are using this code is that it is a strategy that executes orders instantly. This way we can verify that our paper trading account is hooked up properly and receiving orders. Let's first backtest this strategy to make sure there are no syntax errors. Click the play button in the top right corner and observe the performance of the strategy:
We observe that this combination of ETF's help up well, so we decide we want to run this code on our Interactive Brokers paper trading account. To do this, click the lightning bolt in the top right.
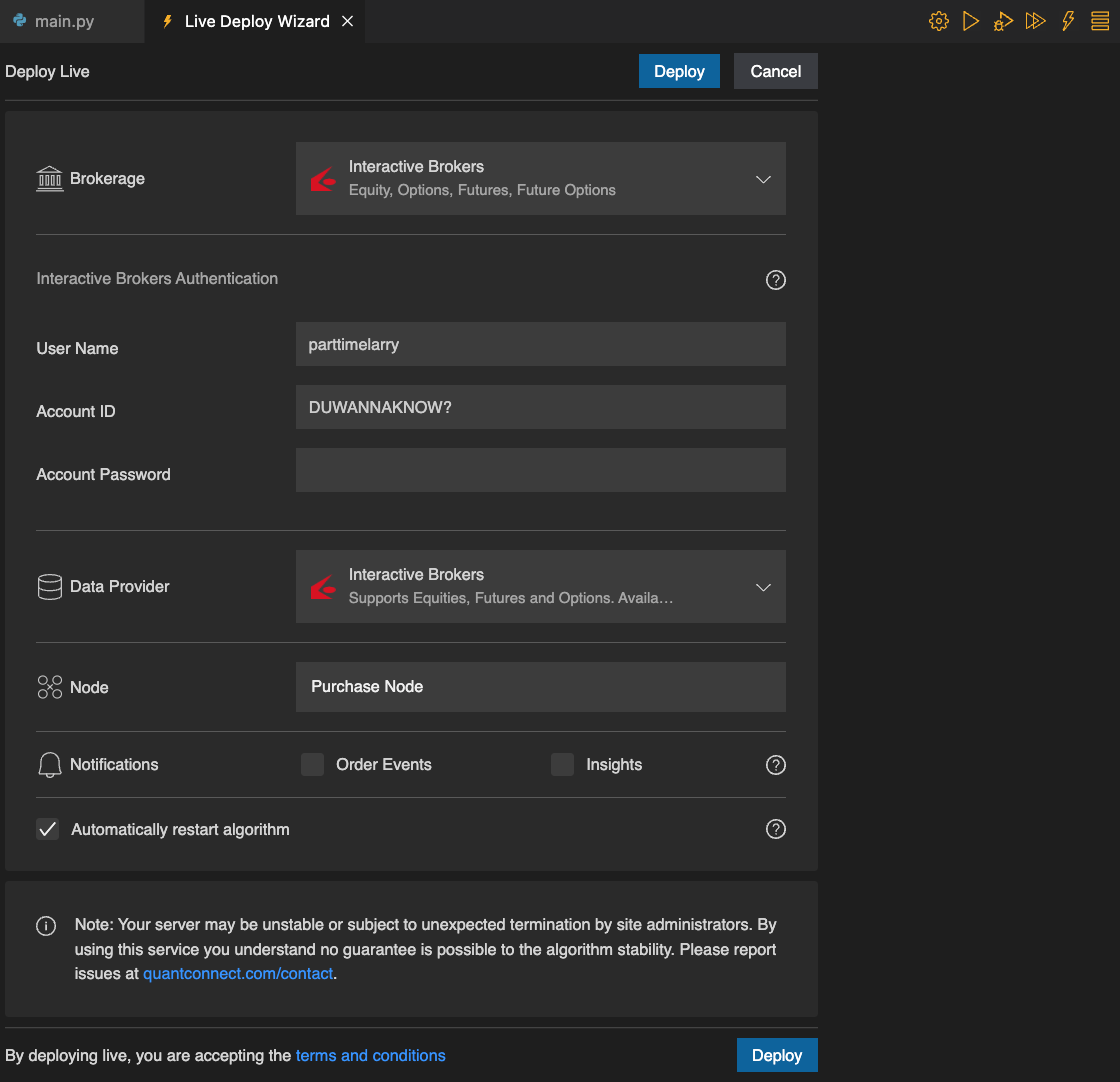
This will open a Live Deploy Wizard where you can connect your Interactive Brokers account.
To connect live trading to Interactive Brokers, you will first need to enable IBKR Mobile Authentication on your IB account via the mobile app.
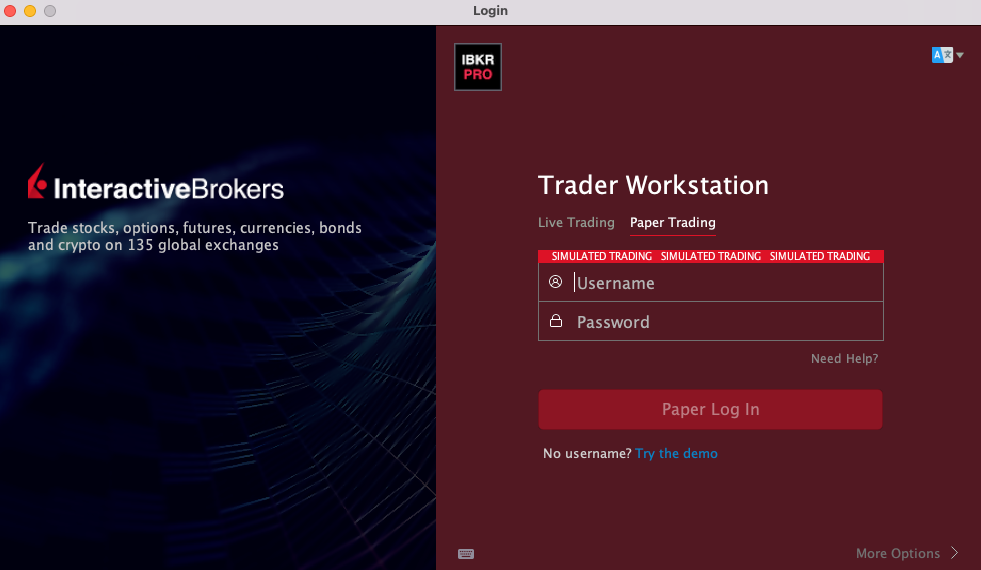
Next you'll need to provide 3 pieces of information in the QuantConnect Live Deploy Wizard: Your Account ID, Username, and Password. The username and password are the same as used to login to Paper Trading on the screen below.
The Account ID is located in the top right of TWS (Trader Workstation) when you log in to Interactive Brokers Paper Trading. It should start with the letters DU and be followed by some numbers. You can also find this with your account information when logged in to Interactive Brokers on the web.
Note: You can not be logged into Trader Workstation or another Interactive Brokers interface while trading via QuantConnect. If you want to be logged in somewhere else, you should do it with a separate username. Otherwise you will get an error message saying that an existing connection was detected.
Enter your account information in the live deployment wizard. Then select the live trading node you want to deploy to. This is what costs money. If you want to live trade using QuantConnect's infrastructure, you will need to pay a monthly fee. Otherwise you'll need to invest in running your own infrastructure.
Once you have added a live trading node, you will be able to select it next to Node. For the Data Provider, I am using the Interactive Brokers data feed since I pay for real-time market data there. But you can alternatively use QuantConnect's data feed. Once you have filled in the wizard, click Deploy.
After you click deploy, you should see a screen like the one below. Note that you also may receive an IBKR Mobile notification on your phone to confirm it was you.
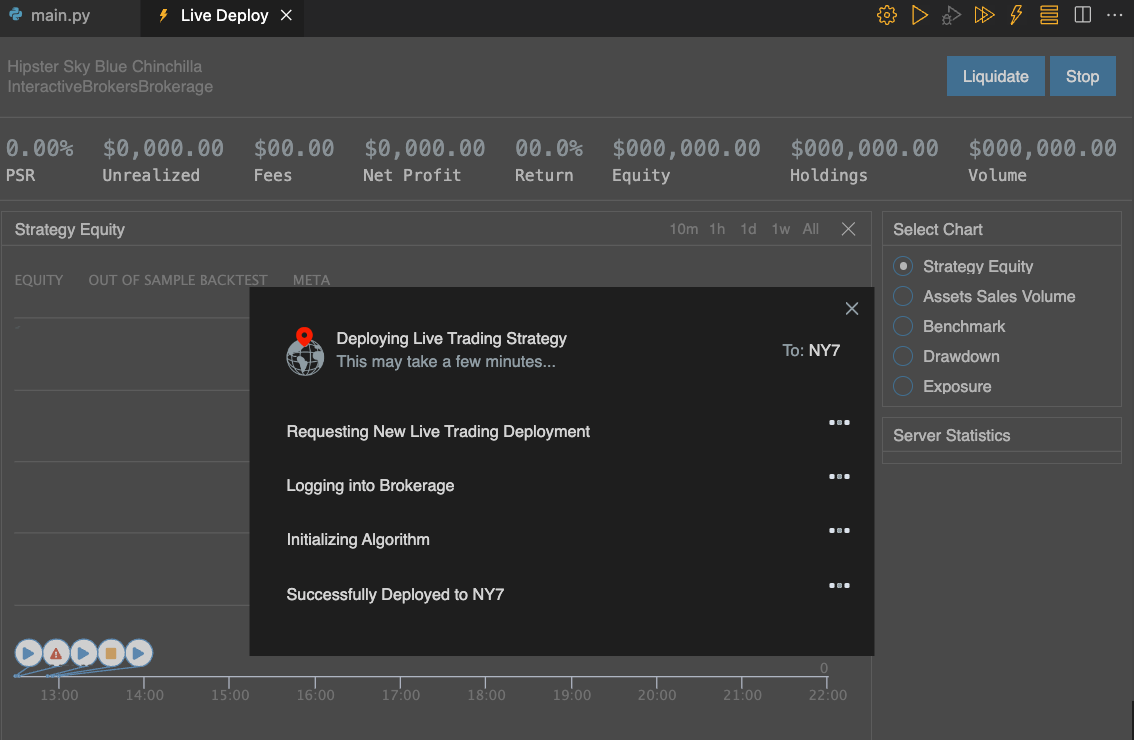
If all goes well, you will QuantConnect synchronize with your IBKR account and execute orders. At the top of the screen you can see the current state of your portfolio and performance.
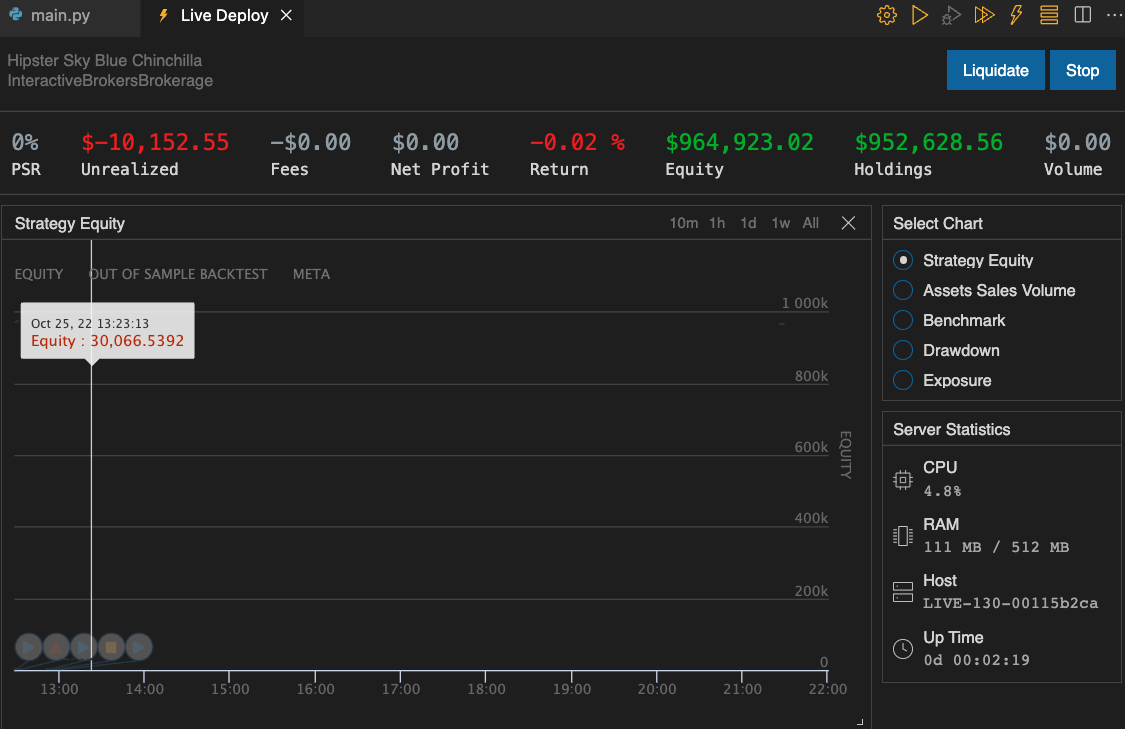
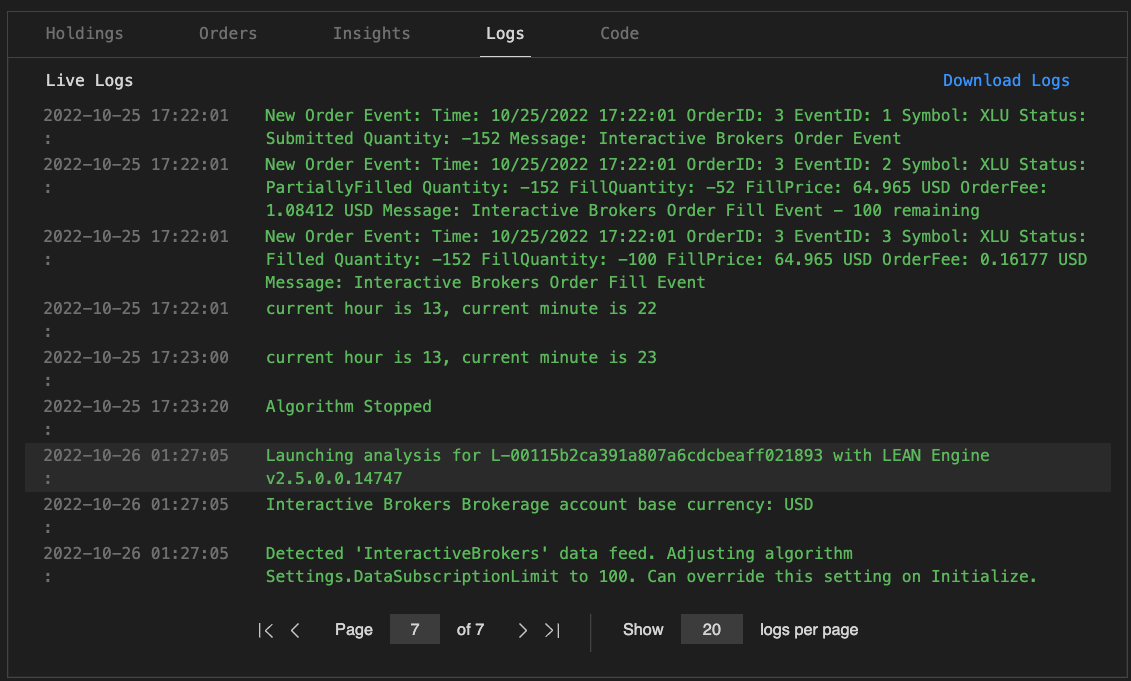
If you scroll down, there are tabs that include orders executed, real-time logs, and more. This way you can monitor that everything is going to plan. If everything worked according to plan, you should see orders execute for XLU, XLE, and XLK in the Orders tab and the Logs tab:
That's it for deploying to QuantConnect Cloud!
The Hard Way
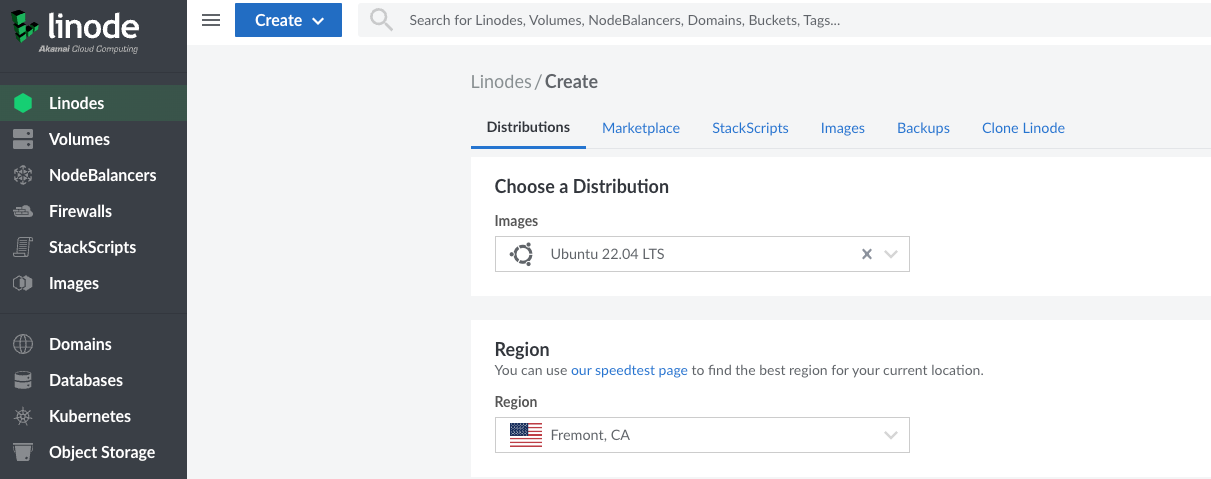
Many people will prefer to run their algorithm on their own server, even if it requires more time and effort. Let's walk through how you would do this. There are many providers of servers out there. Examples include Digital Ocean, AWS, and Google Cloud. I don't have time to write and make a video on every provider – so I focus on the one I personally use, which is Linode. If you sign up using my link, you get $100 in free credits and I get free credits towards my own Linodes.
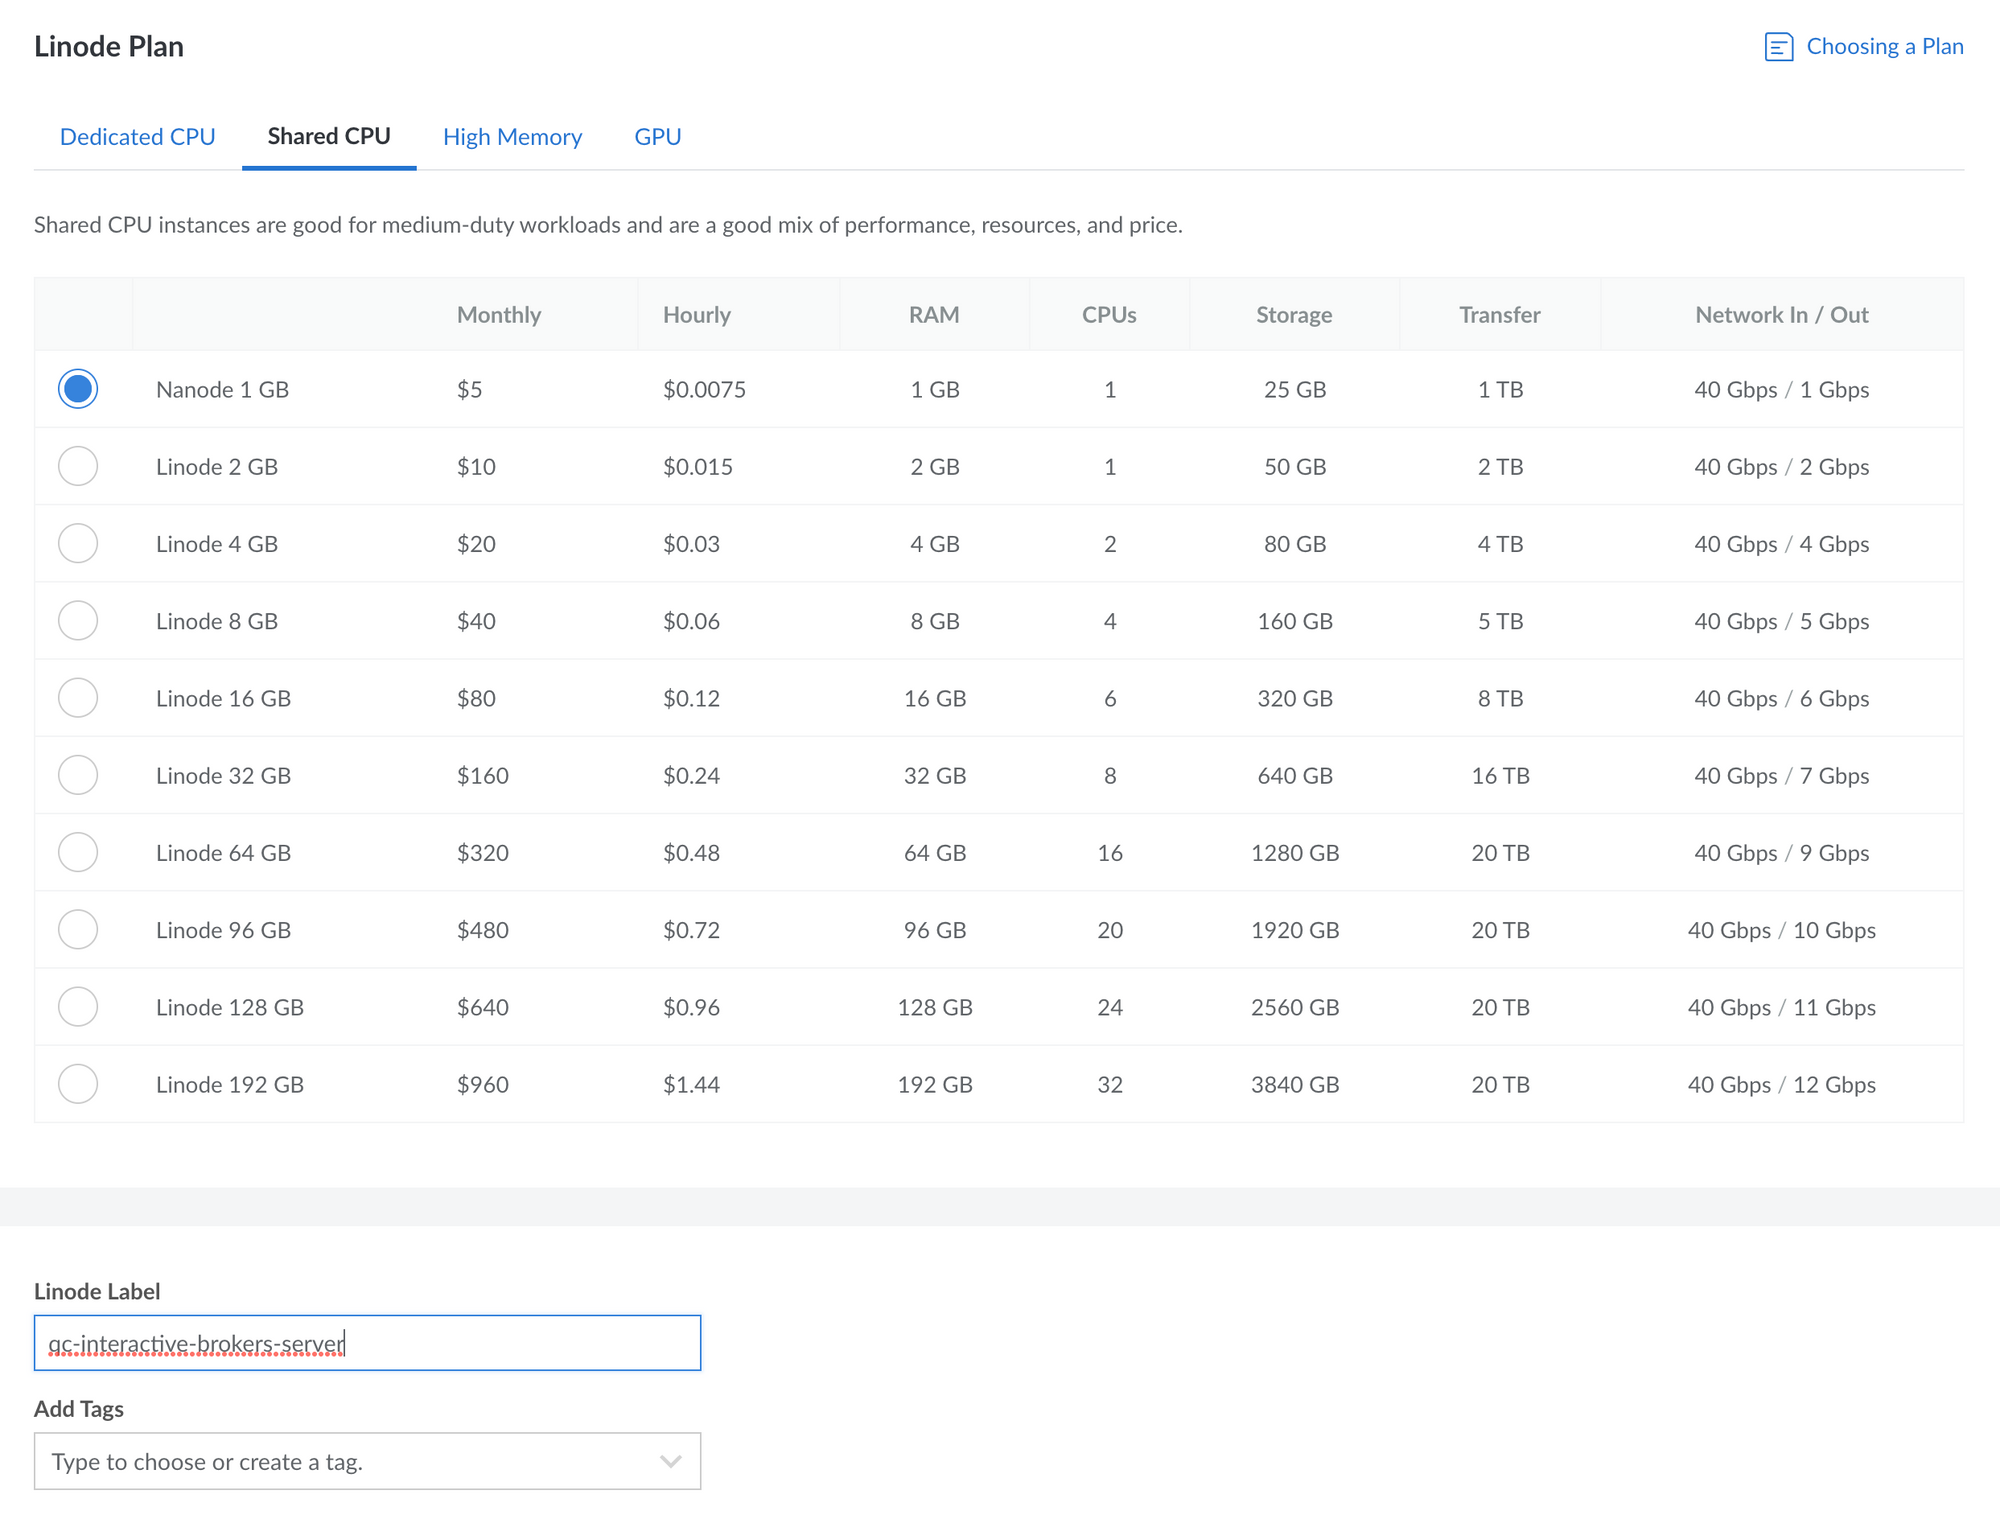
Once you have a Linode account, the steps for setting up a new server are similar to the ones in my freqtrade guide. Log in to Linode and click Create Linode. Under Distribution, choose the Ubuntu 22.04 LTS. Under Region, choose a region close to you. In my case, this is California.
Under Linode plan, I start with the cheapest plan under Shared CPU. If we decide to scale up in the future and add more CPU or RAM, we can easily resize the Linode when the need arises. Under Linode Label, I type a name that is meaningful since I run many servers.
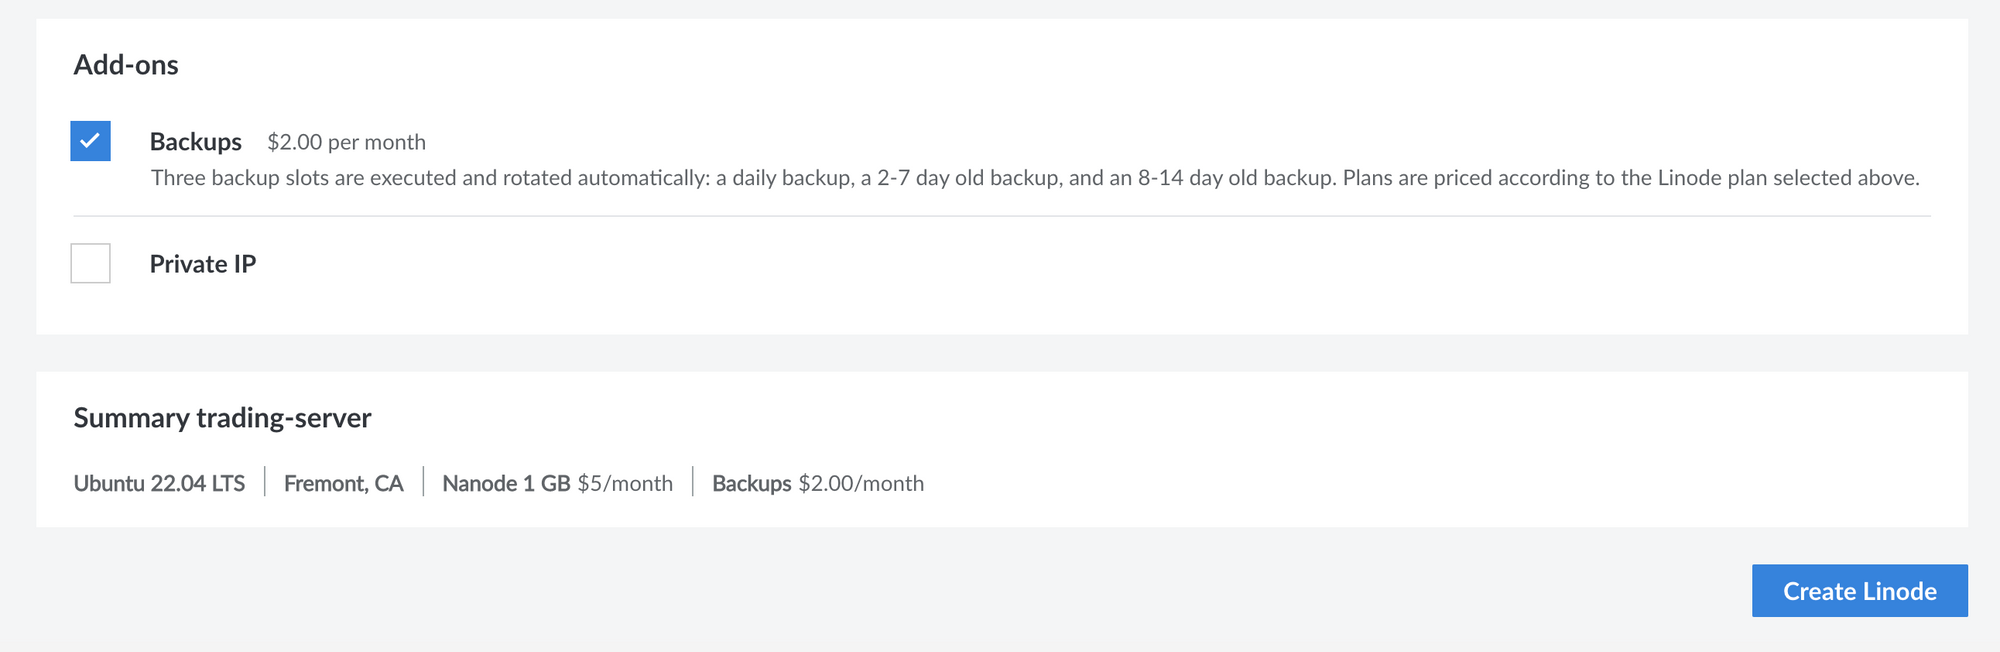
Enter a root password to use for your Linode server. Try not to forget it, but there are ways to recover your password if you do. Alternatively, you can provide an SSH key.

You have the option of enabling backups on server. I recommend doing this if you plan to keep this server running for the long term.
Once you are ready, click Create Linode. This will provision a server and redirect you to the Linode Dashboard. Within a few minutes your server will be up and running.
Connecting to Your Server
Once you see the green dot and RUNNING on the server dashboard, you can SSH into the server. You have a few options for connecting to your server:
- Command line ssh - if you use Linux, Mac OS X, or an updated version of Windows 10, this is already built-in.
- If you use an older version of Windows, you need to install an SSH client like Putty. Newer versions should have this built-in.
- You can click "Launch LISH Console" in the top right of the Linode dashboard if you want to connect using a web interface.
I personally run Mac OS X, so I will copy and run the SSH Access command in the top right. Obviously, your IP address will be different from mine.
ssh root@23.239.4.143Once you have successfully connected to the server, you should see a command line prompt. The first step is to make sure your system is up to date. Run the following command to upgrade any packages:
apt-get update && apt-get upgrade
Add a User
root@localhost:~# adduser trader
Adding user `trader' ...
Adding new group `trader' (1000) ...
Adding new user `trader' (1000) with group `trader' ...
Creating home directory `/home/trader' ...
Copying files from `/etc/skel' ...
New password:
Retype new password:
passwd: password updated successfully
Changing the user information for trader
Enter the new value, or press ENTER for the default
	Full Name []:
	Room Number []:
	Work Phone []:
	Home Phone []:
	Other []:
Is the information correct? [Y/n] y
Add user to Superusers Group
usermod -aG sudo traderInstalling Docker and LEAN
LEAN requires Docker. To install Docker, we can follow the steps in this article from Digital Ocean (another popular VPS company).
Run the following commands to install Docker:
trader@localhost:~# sudo apt install apt-transport-https ca-certificates curl software-properties-common
trader@localhost:~# curl -fsSL https://download.docker.com/linux/ubuntu/gpg | sudo gpg --dearmor -o /usr/share/keyrings/docker-archive-keyring.gpg
trader@localhost:~# echo "deb [arch=$(dpkg --print-architecture) signed-by=/usr/share/keyrings/docker-archive-keyring.gpg] https://download.docker.com/linux/ubuntu $(lsb_release -cs) stable" | sudo tee /etc/apt/sources.list.d/docker.list > /dev/null
trader@localhost:~# sudo apt update
trader@localhost:~# apt-cache policy docker-ce
trader@localhost:~# sudo apt install docker-ce
trader@localhost:~# docker
Next, create a directory for QuantConnect and change into it:
trader@localhost:~# mkdir quantconnect-ib
trader@localhost:~# cd quantconnect-ib/
Installing LEAN requires pip, which doesn't come by default. So we'll now install pip. We'll also create a virtual environment where we will install LEAN and any other packges we'll need.
Install pip
trader@localhost:~/quantconnect-ib# pip
Command 'pip' not found, but can be installed with:
apt install python3-pip
trader@localhost:~/quantconnect-ib# sudo apt install python3-pip
Create Virtual Environment
trader@localhost:~/quantconnect-ib# sudo apt install python3.10-venv
trader@localhost:~/quantconnect-ib# python3 -m venv venv
trader@localhost:~/quantconnect-ib# source venv/bin/activate
(venv) trader@localhost:~/quantconnect-ib# pip install lean
Collecting lean
  Using cached lean-1.0.119-py3-none-any.whl (261 kB)
Collecting python-dateutil>=2.8.2
  Using cached python_dateutil-2.8.2-py2.py3-none-any.whl (247 kB)
Collecting requests>=2.27.1
  Using cached requests-2.28.1-py3-none-any.whl (62 kB)
Collecting click>=8.0.4
Install LEAN
(venv) trader@localhost:~/quantconnect-ib# pip install lean
Collecting lean
  Using cached lean-1.0.119-py3-none-any.whl (261 kB)
Collecting python-dateutil>=2.8.2
  Using cached python_dateutil-2.8.2-py2.py3-none-any.whl (247 kB)
Collecting requests>=2.27.1
  Using cached requests-2.28.1-py3-none-any.whl (62 kB)
Collecting click>=8.0.4
Configuring LEAN for Live Trading
First we'll initialize our directory using the lean init command:
(venv) trader@localhost:~/quantconnect-ib# lean initThis will pull the LEAN docker image to our server. Enter python when you are prompted for a default language:
┌──────────────────────────────────────────── Announcements ─────────────────────────────────────────────┐
│ 2022-08-26: We've added support for python 3.10 and deprecated python version 3.6.                     │
│ 2022-05-23: We've added new json based approach of adding new modules to reduce the overhead and       │
│             duplications.                                                                              │
│ 2022-02-02: We've added cloud live support for Samco and Zerodha brokerages for India Market           │
│ 2022-01-26: We've added support for Samco brokerage for India Market and FTX.US Exchange               │
│ 2021-11-17: We've added support for Kraken and FTX brokerages                                          │
│ 2021-06-21: We've just released a new opening video of the CLI:                                        │
│             https://youtube.com/watch?v=QJibe1XpP-U                                                    │
│ 2021-06-21: Building an Algo on Privacy Keywords using TiingoNews:                                     │
│             https://quantconnect.com/blog/building-an-algo-on-privacy-keywords-using-tiingonews/       │
│ 2021-06-11: Check out our mini video series on how to use the CLI:                                     │
│             https://youtube.com/playlist?list=PLD7-B3LE6mz61Hojce6gKshv5-7Qo4y0r                       │
└────────────────────────────────────────────────────────────────────────────────────────────────────────┘
This command will create a Lean configuration file and data directory in the current directory
The current directory is not empty, continue? [y/N]: y
Downloading latest sample data from the Lean repository...
Download Progress 10.0 MB
Download Progress 30.0 MB
Download Progress 50.0 MB
Download Progress 70.0 MB
Download Progress 90.0 MB
Download Progress 110.0 MB
Download Progress 130.0 MB
Download Progress 150.0 MB
Download Progress 170.0 MB
Download Progress 190.0 MB
What should the default language for new projects be? (python, csharp) [python]: python
If all goes well, you should see a lean.json file and a data folder in the current directory:
The following objects have been created:
- lean.json contains the configuration used when running the LEAN engine locally
- data/ contains the data that is used when running the LEAN engine locally

The following documentation pages may be useful:
- Setting up local autocomplete: https://www.lean.io/docs/v2/lean-cli/projects/autocomplete
- Synchronizing projects with the cloud:
https://www.lean.io/docs/v2/lean-cli/projects/cloud-synchronization

Here are some commands to get you going:
- Run `lean create-project "My Project"` to create a new project with starter code
- Run `lean cloud pull` to download all your QuantConnect projects to your local drive
- Run `lean backtest "My Project"` to backtest a project locally with the data in data/
Authenticate to QuantConnect and Pull Down Your Projects
The first time you run lean cloud pull, you will get an error message saying you must login to your account:
(venv) trader@localhost:~/quantconnect-ib# lean cloud pull
Error: UserID not valid
Please login to your account. https://www.quantconnect.com/docs/v2/lean-cli/api-reference/lean-login
To login, you need to request your QuantConnect User Id and Token. Create a QuantConnect account (if you haven't already). Then click "Request Email With Token and Your User-id" on the account settings page.

You will receive an email with the needed information. Type lean login to authenticate:
(venv) trader@localhost:~/quantconnect-ib# lean login
Your user id and API token are needed to make authenticated requests to the QuantConnect API
You can request these credentials on https://www.quantconnect.com/account
Both will be saved in /root/.lean/credentials
User id: 119779
API token: ****************************************************************
Successfully logged in
Once you have logged in, type lean cloud pull to pull down your projects.
(venv) root@localhost:~/quantconnect-ib# lean cloud pull
[1/26] Pulling 'Calm Violet Galago'
Successfully pulled 'Calm Violet Galago/main.py'
Successfully pulled 'Calm Violet Galago/research.ipynb'
[2/26] Pulling 'Crawling Fluorescent Pink Shark'
Successfully pulled 'Crawling Fluorescent Pink Shark/main.py'
Successfully pulled 'Crawling Fluorescent Pink Shark/research.ipynb'
[3/26] Pulling 'Emotional Light Brown Hamster'
[4/26] Pulling 'Fat Red-Orange Horse'
Successfully pulled 'Fat Red-Orange Horse/main.py'
Successfully pulled 'Fat Red-Orange Horse/research.ipynb'
[5/26] Pulling 'Green Line Breakout'
Successfully pulled 'Green Line Breakout/main.py'
Successfully pulled 'Green Line Breakout/research.ipynb'
[6/26] Pulling 'Growth Stocks'
Awesome!
Live Trading with LEAN
List the contents of the current directory. You'll see there is a folder for each of your projects. To trade one of your algorithms, simply type lean live followed by the name of your project. Note I used quotes around the project name since it contains spaces:
(venv) trader@localhost:~/quantconnect-ib# lean live 'Hipster Sky Blue Chinchilla'
Select a brokerage:
1) Paper Trading
2) Interactive Brokers
3) Tradier
4) Oanda
5) Bitfinex
6) Coinbase Pro
7) Binance
8) Zerodha
9) Samco
10) Terminal Link
11) Atreyu
12) Trading Technologies
13) Kraken
14) FTX
Enter an option: 2
At the prompt, choose Interactive Brokers for your brokerage. You will be asked to select your QuantConnect organization. For me this happened automatically. You will also be prompted for your username, password, and Account ID. I discussed where this information comes from at the beginning of this tutorial.
Select the organization with the Interactive Brokers module subscription: Part Time Larry
To use IB with LEAN you must disable two-factor authentication or only use IBKR Mobile. This is done from
your IB Account Manage Account -> Settings -> User Settings -> Security -> Secure Login System. In the
Secure Login System, deselect all options or only select "IB Key Security via IBKR Mobile". Interactive
Brokers Lite accounts do not support API trading.
Username:
You will then be prompted to choose a data feed:
Select a data feed:
1) Interactive Brokers
2) Tradier
3) Oanda
4) Bitfinex
5) Coinbase Pro
6) Binance
7) Zerodha
8) Samco
9) Terminal Link
10) Kraken
11) FTX
12) IQFeed
13) Polygon Data Feed
14) Custom data only
To enter multiple options, separate them with comma.: 1
For data feed, you will choose 1. Notice you get the message to enable delayed streaming data. This is because real-time stock market data costs money.
Downloading 'QuantConnect.InteractiveBrokersBrokerage.2.5.14735.nupkg'
Downloading 'QuantConnect.InteractiveBrokersBrokerage.ToolBox.2.5.14735.nupkg'
Error: Please configure the following missing property in /root/quantconnect-ib/lean.json:
- ib-enable-delayed-streaming-data
Go to the following url for documentation on this property:
https://www.lean.io/docs/v2/lean-cli/live-trading/brokerages/quantconnect-paper-trading
Since we want to use real-time data, we will want to enable our Interactive Brokers market data subscription. I personally have the following Market Data Subscriptions in Interactive Brokers. In particular, the US Equity and Options Add-On Streaming Bundle and the US Securities Snapshot and Futures Value Bundle.

The error message that we received above says to set this information in the lean.json file. I found this a bit misleading – if I edit the lean.json file directly, then run lean live again, it will overwrite my changes and result in the same error message. The key, I've found, is to pass this information as command line parameters in the following format:
(venv) trader@localhost:~/quantconnect-ib# lean live "Hipster Sky Blue Chinchilla" --brokerage "Interactive Brokers" --data-feed "Interactive Brokers" --ib-enable-delayed-streaming-data true --ib-user-name yourusername --ib-account youraccount --ib-password yourpasswordWe don't want to type this information on the command line. We also don't want to type this command over and over again. So we will create a few environment variables and a short shell script to run this. We can do this in our .profile. You are free to approach this differently if you would like to store your credentials in another location.
(venv) trader@localhost:~/quantconnect-ib# nano ~/.profileAt the end of this file, export the following variables.
export IB_USERNAME=youribusername
export IB_ACCOUNT=DU1234567
export IB_PASSWORD=youribpassword
Then type the following command to make these variables available.
trader@localhost:~/quantconnect-ib# source ~/.profileYou should be able to echo your username variable back to the screen:
trader@localhost:~/quantconnect-ib$ echo $IB_USERNAME
youribusername
Now when I run the following command, LEAN should be able to authenticate against my Interactive Brokers account using the environment variables we set. Be sure to replace the project name "Hipster Sky Blue Chinchilla" with your own project name. Note: LEAN will pull down a docker image when you run this the first time. From my observations, QuantConnect installs and runs IB Gateway automatically.
(venv) trader@localhost:~/quantconnect-ib# lean live "Hipster Sky Blue Chinchilla" --brokerage "Interactive Brokers" --data-feed "Interactive Brokers" --ib-enable-delayed-streaming-data true --ib-user-name $IB_USERNAME --ib-account $IB_ACCOUNT --ib-password $IB_PASSWORDAlso make sure you don't have any other sessions open. If you already have live trading running on a project on QuantConnect's Cloud, then you will not be able to run another live trading session on your server.
If all went well, you should start seeing log messages from your strategy! Below we can see data subscriptions for XLE. You should also see orders submitted shortly thereafter.
Data Subscription Logs
20221025 19:38:54.451 TRACE:: EventBasedDataQueueHandlerSubscriptionManager.Subscribe(): XLE
20221025 19:38:54.451 TRACE:: InteractiveBrokersBrokerage.Subscribe(): Subscribe Request: XLE
20221025 19:38:54.452 TRACE:: InteractiveBrokersBrokerage.GetContractDetails(): XLE (STK XLE USD Smart)
20221025 19:38:54.788 TRACE:: InteractiveBrokersBrokerage.GetContractDetails(): clientOnContractDetails
event: STK XLE USD SMART  0
20221025 19:38:54.790 TRACE:: InteractiveBrokersBrokerage.GetContractDetails(): contracts found: 1
20221025 19:38:54.790 TRACE:: InteractiveBrokersBrokerage.Subscribe(): Subscribe Processed: XLE (STK XLE
USD Smart ARCA  0 ) # 4. SubscribedSymbols.Count: 2
20221025 19:38:54.791 TRACE:: DataManager.AddSubscription(): Added
XLE,#0,XLE,Minute,TradeBar,Trade,Adjusted,OpenInterest. Start: 10/25/2022 7:38:54 PM. End: 12/31/2050
5:00:00 AM
20221025 19:38:54.792 TRACE:: DataManager.AddSubscription(): Added
XLE,#0,XLE,Minute,QuoteBar,Quote,Adjusted,OpenInterest. Start: 10/25/2022 7:38:54 PM. End: 12/31/2050
5:00:00 AM
Order Execution
Order: (1) - OrderId: 1 (BrokerId: ) New Market order for 2498 units of XLK  Status: Unprocessed
20221025 19:39:00.098 TRACE:: Total margin information: TotalMarginUsed: 0.00, MarginRemaining: 975020.06
20221025 19:39:00.102 TRACE:: Order request margin information: MarginUsed: 0.00, MarginRemaining:
975020.06
20221025 19:39:00.126 TRACE:: InteractiveBrokersBrokerage.PlaceOrder(): Symbol: XLK Quantity: 2498. Id: 1
20221025 19:39:00.776 TRACE:: InteractiveBrokersBrokerage.HandleOpenOrder(): OrderId: 8, Contract: STK XLK
USD SMART, OrderStatus: PreSubmitted
20221025 19:39:00.833 TRACE:: InteractiveBrokersBrokerage.HandleOrderStatusUpdates(): OrderId: 8, Status:
PreSubmitted, Filled: 0, Remaining: 2498, AverageFillPrice: 0, PermId: 1011336387, ParentId: 0,
LastFillPrice: 0, ClientId: 0, WhyHeld: ,MktCapPrice: 0
20221025 19:39:00.893 TRACE:: LiveTradingResultHandler.OrderEvent(): Time: 10/25/2022 19:39:00 OrderID: 1
EventID: 1 Symbol: XLK Status: Submitted Quantity: 2498 Message: Interactive Brokers Order Event BrokerId:
8
20221025 19:39:00.914 TRACE:: InteractiveBrokersBrokerage.HandleExecutionDetails(): RequestId: -1, Symbol:
XLK, OrderId: 8, Time: 20221025  19:39:00, Side: BOT, Shares: 100, Price: 128.45, CumQty: 100, PermId:
InteractiveBrokersBrokerage.HandleOpenOrder(): OrderId: 8, Contract: STK XLK
USD SMART, OrderStatus: PreSubmitted
20221025 19:39:00.917 TRACE:: InteractiveBrokersBrokerage.HandleOrderStatusUpdates(): OrderId: 8, Status:
PreSubmitted, Filled: 100, Remaining: 2398, AverageFillPrice: 128.45, PermId: 1011336387, ParentId: 0,
LastFillPrice: 128.45, ClientId: 0, WhyHeld: ,MktCapPrice: 0
20221025 19:39:00.919 TRACE:: InteractiveBrokersBrokerage.HandleExecutionDetails(): RequestId: -1, Symbol:
XLK, OrderId: 8, Time: 20221025  19:39:00, Side: BOT, Shares: 298, Price: 128.45, CumQty: 398, PermId:
InteractiveBrokersBrokerage.HandleOpenOrder(): OrderId: 8, Contract: STK XLK
USD SMART, OrderStatus: PreSubmitted
20221025 19:39:00.921 TRACE:: InteractiveBrokersBrokerage.HandleOrderStatusUpdates(): OrderId: 8, Status:
PreSubmitted, Filled: 398, Remaining: 2100, AverageFillPrice: 128.45, PermId: 1011336387, ParentId: 0,
LastFillPrice: 128.45, ClientId: 0, WhyHeld: ,MktCapPrice: 0
20221025 19:39:00.921 TRACE:: InteractiveBrokersBrokerage.HandleOpenOrder(): OrderId: 8, Contract: STK XLK
USD SMART, OrderStatus: Submitted
Awesome! We are running live trading on our own server using LEAN.
Updating Our Algorithm
Let's say we notice something wrong and want to update our algorithm. How would we do this? Let's first stop LEAN with Ctrl-C and see if it gracefully shuts down. There is also a lean live stop command:
lean live stop 'Hipster Sky Blue Chinchilla'It is also helpful to know Docker and process management commands in case you need to stop the container or kill a process:
(venv) trader@localhost:~/quantconnect-ib$ sudo docker ps
CONTAINER ID   IMAGE                      COMMAND                  CREATED          STATUS          PORTS     NAMES
02c5db2eac19   quantconnect/lean:latest   "bash /lean-cli-star…"   8 minutes ago    Up 8 minutes              lean_cli_b3408658050a48f1b8efa80ec563a378
(venv) trader@localhost:~/quantconnect-ib$ sudo docker stop 02c5db2eac19Then, let's go to our code editor and change the allocations for each ETF to 1 percent and save it.
# region imports
from AlgorithmImports import *
# endregion

class SectorETFStrategy(QCAlgorithm):

    def Initialize(self):
        self.SetStartDate(2021, 1, 1)  # Set Start Date
        self.SetCash(10000)
        tech = self.AddEquity("XLK", Resolution.Minute)
        energy = self.AddEquity("XLE", Resolution.Minute)
        utilities = self.AddEquity("XLU", Resolution.Minute)

    def OnData(self, data: Slice):
        if not self.Portfolio.Invested:
            self.SetHoldings("XLK", 0.01)
            self.SetHoldings("XLE", 0.01)
            self.SetHoldings("XLU", 0.01)
Now let's pull the updated code to our server with lean cloud pull:
```
(venv) trader@localhost:~/quantconnect-ib$ lean cloud pull
[1/26] Pulling 'Calm Violet Galago'
[2/26] Pulling 'Crawling Fluorescent Pink Shark'
[3/26] Pulling 'Emotional Light Brown Hamster'
[4/26] Pulling 'Fat Red-Orange Horse'
[5/26] Pulling 'Green Line Breakout'
[6/26] Pulling 'Growth Stocks'
[7/26] Pulling 'Hipster Sky Blue Chinchilla'
Successfully pulled 'Hipster Sky Blue Chinchilla/main.py'
You'll notice it pulls the latest copy of your project. Now you can just re-run the lean live command for your project.
Instead of typing the long lean live command again or searching through our history, let's create an alias for it in our .profile file. Here I am creating two alias commands named "activate" and "trade". The "activate" command just activates the virtual environment. The "trade" command runs our long "lean live" command. Feel free to customize these as you see fit. You can even create a shell script or Python script to automate various tasks. Make the following changes to your .profile comand, then save it.
Notice the characters I put after $IB_PASSWORD. This redirects the output and runs the process in the background. Now rather than streaming the logs to your screen, the process will be run in the background. You will still be able to monitor the log files on the filesystem.
alias activate='cd /home/trader/quantconnect-ib/ && source venv/bin/activate'

alias trade='lean live "Hipster Sky Blue Chinchilla" --brokerage "Interactive Brokers" --data-feed "Interactive Brokers" --ib-enable-delayed-streaming-data true --ib-user-name $IB_USERNAME --ib-account $IB_ACCOUNT --ib-password $IB_PASSWORD > /dev/null 2>&1 &'
Reload your profile file:
source ~/.profileNow use these commands to start live trading:
trader@localhost:~/quantconnect-ib$ activate
(venv) trader@localhost:~/quantconnect-ib$ trade
[1] 13772
Now let's check the log files:
(venv) trader@localhost:~/quantconnect-ib$ cd Hipster\ Sky\ Blue\ Chinchilla/
(venv) trader@localhost:~/quantconnect-ib/Hipster Sky Blue Chinchilla$ ls
config.json  live  main.py  __pycache__  research.ipynb  storage
(venv) trader@localhost:~/quantconnect-ib/Hipster Sky Blue Chinchilla$ cd live
(venv) trader@localhost:~/quantconnect-ib/Hipster Sky Blue Chinchilla/live$ ls
2022-10-26_17-24-31  2022-10-26_17-31-23  2022-10-26_17-37-31  2022-10-26_18-09-03  2022-10-26_18-30-38
2022-10-26_17-30-30  2022-10-26_17-34-19  2022-10-26_17-38-52  2022-10-26_18-18-12  2022-10-26_18-51-57
What's cool here is that QuantConnect has already built a lot of tooling and made many decisions made for you. You get a history of the code that was run and the log files generated. They are timestamped and organized nicely in a folder structure. As you iterate and make improvements, you will be able to see what you have done in the past and the results. There are also structured JSON files containing various performance metrics in case you want to build your own tools using them.
To see what is happening in the logs, simply run tail -f on the latest run of your strategy. For example:
trader@localhost:~/quantconnect-ib/Hipster Sky Blue Chinchilla/live/2022-10-26_18-09-03$ tail -f log.txt
2022-10-26T18:09:24.8490719Z TRACE:: InteractiveBrokersBrokerage.OnIbAutomaterOutputDataReceived(): IBAutomater process started - Id:142 - Name:IBAutomater.sh - InitializationTimeout:00:15:00
2022-10-26T18:09:24.8783014Z TRACE:: InteractiveBrokersBrokerage.OnIbAutomaterOutputDataReceived(): UID          PID    PPID  C    SZ   RSS PSR STIME TTY          TIME CMD
2022-10-26T18:09:24.8789104Z TRACE:: InteractiveBrokersBrokerage.OnIbAutomaterOutputDataReceived(): root           1       0 39 819860 312056 0 18:09 ?        00:00:06 dotnet QuantConnect.Lean.Launcher.dll
When you are ready to change to live trading, simply switch the environment variables in your .profile file (i.e. use your live trading username). Reload it the .profile, and run your trade.sh script again.
Next Steps
My personal next steps will be to try live trading with QuantConnect and Interactive Brokers for a longer period of time, see if I encounter any difficulties, document them, and share them with you. Stay tuned.